
1955, 1956, 1957 Chevy Heat and Sound Insulation Installation
-Alan Arnell
If you live in the warmer parts of the World you want to have A/C in your Classic Chevy. However, once an A/C unit is installed to benefit from it more completely you will need to insulate the interior of you now cooler Classic. Another, benefit of installing insulation is it will also insulate the outside sounds, making your music, conversation and in some cases sanity all the better.
The way to solve the problem of a hot and noisy classic is to place some type of insulation or an insulation kit in that classic. The insulation will keep the heat out, keep your air conditioning in and will greatly reduce exhaust, road, engine, rear end noise and vibration as well. Many brands of insulation come with a super easy to install self-adhesive that will stick to any interior surface you apply it to. The best insulation will be made with butyl and aluminum with around 1/16” total thickness. The thinner the insulation mat the easier it will be to install into tight cavities. I would look for 3.6 insulating power.
Tools needed: Scissors and Knife
Steps to complete:
- The floor in Tri-Five Chevys is fairly flat and is pretty easy to cover with floor insulation. Try to cover every inch of the floor with mat to help keep the heat and noise out.
- I have never done my top of my car because of the cost involved with removing and replacing the headliner, however over 50% of heat and sound enter the car can come from the roof.
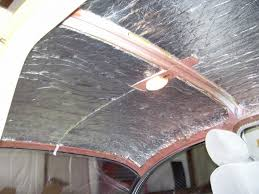
- A putty knife and elbow grease is the way to remove old top insulation. The removal of the roof material will make a big mess. It is recommended to complete the top with insulation before the floor is done in your Tri-Five Chevy.
- 1/16” insulation thickness is really best in insulating the roof as the 1/16” material is usually thinner than the original insulation, fighting off most clearance issues with the headliner support wires
- In areas where the insulation needs to be trimmed, a pair of kitchen scissors will do the trick.
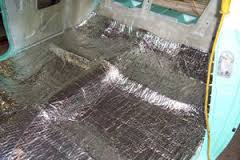
- To complete the floor, start at the center of the car and work your way out to the rocker panels. Save any cut scraps, as they can be used to fill in small, yet to be covered, areas on the floor. A carpet or box knife can be used to cut the holes in the floor for the shifter hole, seat belt brackets, etc.
- Starting at the forward toe boards work you way to the rear of the car. Sections of insulation will need to be cut to fill in the area in the front of the rear seat riser and to the inner rockers.
- A wedge of insulation can be cut from scrap to fill the area between the toe board and transmission tunnel.
- Cover the area under the rear seat.
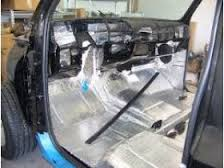
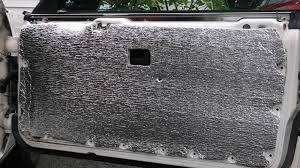
- I placed insulation in the inner skin and behind the door upholstery panels. However, it is best to place the insulation on the inner skin of each door panel. I later went in and add additional insulation to the inn door outside panels. Wear long sleeves to keep from slicing up your arms placing the insulation through the access openings of the inner door panel. It is easier to fold the cut to shape insulation while passing it through the door access panels.
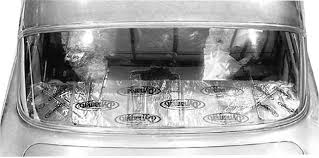
- Take out the back dash upholstery and insulate the package deck metal. Use a carpet knife to trim around the speaker holes and back glass.
- Using card board or ¼’ plywood dive the space between the passenger area and the trunk, then cover the area behind the back seat with insulation. This divider of the passenger and trunk areas well help seal heat and noise from the trunk.
- The last step is to enjoy a more quieter and cooler Classic Car.

FREE HOT ROD eBOOK
!!!Support Texas Classic Experience!!!
Did you like the blog? If you did, the best way to support Texas Classic Experience is to share this post! Please tell others that you liked this post by sharing it with your car friends by sending them a link to this page. http://texasclassicchevyexperience.blogspot.com/

My winning Peal Out at the 2011 Lone Star Classic Convention in Dallas
Texas Classic Chevy Experience will post blogs about: Hot Rods, Chevy, Chevrolet, Drag Racing, Car Shows, Classic Cars, Custom Cars, Muscle Cars, How to Tech. posts, Dallas Area Classic Chevy Club, Texas Muscle Car Challenge, Tri-Five Nationals, Lone Star Chevy Convention, Classic Car lists, Classic car links, Spotters guides, Car Shows, Swap meets, Book reviews and More.
*********************
A Great Tri5 Chat Board

~~~~
*********************************************************************************************************
Texas Classic Experience Blog @ http://bit.ly/1KQv5Rn
Texas Classic Chevy Experience Blog @ http://www.texasclassicchevyexperience.com/
#TriFive
#Chevy #Belair
#Musclecar #HotRod #V8
#StreetRod #DragRacing #55Chevy
#56Chevy #57Chevy #nomad #sedandelivery #ChevyTruck #truck #wagon #corvette #Classicchevy #ClassicCar #Chevy150 #Chevy210 #Carshow #Custom #Chevrolet
#Chevy350 #Chevy283 #Chevy454 #Chevy327 #ChevyLS
#55Belair #56Belair #57Belair #57hardtop #57ragtop #blower #hemi #convertible #1950s #restoration #custompaint #classics #cars #FastNLoud GasMonkeyGarage #americangraffiti #americana #vintage #Texas #TexasClassicChevyExperience #Patina #carphotography #oldcar #chev #chopped #hotrodart #greaserlife #Rockabilly #concours #hamb #horsepower #vintagecars #oldschool #dragstrip #nostalgia #retro #nostalgiadrags #kustom #Mooneyes
**********************************************************************************************************
No comments:
Post a Comment
Note: Only a member of this blog may post a comment.