
How to Replace Your Classic Chevy’s Intake Manifold
-Alan Arnell
Back in 1975 I had a 1969 Chevelle Malibu that had a 307 cubic inch engine. I have said it many times and I’ll say it again, if you want to race your 307, then you plan to lose. Needless to say, I wanted more horsepower out of my non swing mill. Being only 17 years old my mechanical skills were in their beginning stages. Neither having the skills or the tools to complete an engine swap, I chose to replace the car’s stock 2-barrel carburetor and intake manifold to a stock 4-barrel carburetor and intake manifold. The new stock setup for my engine came off a friends 327 cubic engine he had taken out of his 1965 Chevelle, replacing the setup with an aluminum manifold and a Holley 650 carburetor. I payed 20 bucks for his old parts.

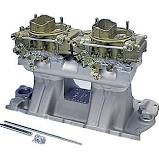
A 4-barrel intake manifold or better the aluminum intake lets the world see how serious you are about horsepower production. Some intakes can increase performance at an affordable price. Almost as important, the aluminum intake gives an engine that sought after cool look.
Sadly, intake-manifold gaskets can leak. You don’t have to be a rocket scientist to know that external leaks can cause an oily mess under the engine. Besides the mess the leaky gasket will cause a loss in performance or smoke from the exhaust. These things happen when oil is pulled via the engine vacuum past a gasket into an intake port. The result can be smoke from one or both tailpipes, fouled spark plugs, or poor idle.
The cause is is usually improper gaskets installation. Yet, the good news is that replacing the intake manifold gaskets is pretty simple.
Steps to complete a gasket and manifold swap.
The parts and tools you will need include:
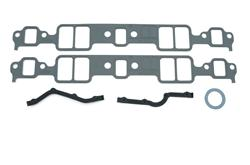
- Intake gasket set
- Gasket sealant
- Gasket scraper or putty knife
- Basic hand tools, torque wrench in lb-ft.

Choosing the correct intake gasket for you engine is very important to the success of the project. If you or someone else has ported the heads or the intake ports are larger than stock you have to use matching intake manifold gaskets.
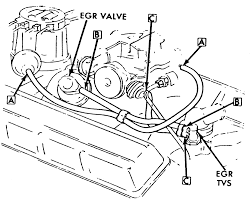
Note: Take pictures of everything you are to remove during the project. Especially, the carburetor linkages and vacuum lines.
Steps:
- Remove all vacuum hoses, brackets and linkage. Note: Write the order of how you had to remove the parts to save time during reassembly, when you put a part on to only have to take it back off to get another offending part on the engine.
- Remove plug wires and the distributor cap. (Some say you can push the cap and wires over to the side out of the way) Note: Use making tape to write number to the wires to the correct spark plugs. I even go a far as to use tape to number the corresponding holes in the distributor cap.
- With the distributor cap off make a note of the position of the rotor cap, if your engine is equipped with one and don't have an electronic ignition. Note: I bump the engine starter to have the cap pointing to number one spark plug. Doing so can help during assembly.
- Mark the position of the distributor housing to the intake manifold with a marker. This helps keep the timing in range when the job is completed.
- Remove the distributor housing.

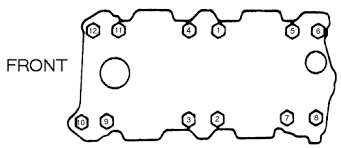
- Remove the intake bolts. Small blocks have 12 bolts. Clean each bolt and run a tap through all the holes in the cylinder heads, because doing so cleans the threads allowing more accurate torque readings. The tap is a 3/16-16 coarse thread.
- Remove the intake manifold by slowly prying it up from one side. A long screwdriver tapped into the position with a small hammer works. It does not come off easily but unless you have hundreds of thousands of miles on the engine it shouldn’t be that hard. If the manifold will not come off, double check to insure all the bolts are truly removed.
- When the manifold is loose from the gaskets lift it and set it safely out of the way.

- Protect the inside of the engine and ports for falling debris with towels. Use paper towels in the ports as added protection.
- Remove the old gaskets. If you choose to use gasket remover keep it away from your hands, paint and wires.
- Use a putty knife or a gasket scraper to remove all the old gaskets. When the gaskets are removed from the engine and intake manifold, wipe both surfaces clean with brake cleaner or similar solvent.
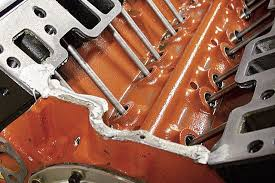
- To prevent gaskets from leaking, sparingly add RTV silicone to the front and rear seal area as well as around each water passage. A ¼-inch bead will do the trick just fine. RTV may also be used in place of cork or rubber end seals. If you use too much RTV the residual can squeeze out into the engine. Be sure to make a continuous bead into the corner areas to prevent leaks. To seal and hold the gaskets around the intake ports, apply sealant such as Permatex’s High Tack that resists gasoline. If TRV is used around the intake ports, it will eventually soften from gasoline and allow oil to leak into the port.
- Place the intake manifold squarely onto the engine, ensuring everything is lined up.
- Use four boles and snug them to the four corners of the intake manifold. If you decide to replace your intake bolts, be sure not to exceed the original bolt’s length. If you do, you may have intake bolts that will contact some of you engine’s push rods. Bad, very bad!
- Install the remaining intake-manifold bolts and tighten starting from the middle an and working out starting at 15 lb-ft of torque. Make another pass at tightening the bolts at 5 lb-ft increments to arrive at 25 lb-ft for the finished tightness. Then make another pass at 25 lb-ft for the final tightening.
- Reinstall the distributor to its proper position.
- Install remaining brackets, hoses, carburetor and spark plug wires.
- Check all connections for leaks. Make a full-throttle check as the engine may be ok at idle and not under power.
- With the engine started and idling, double-check the ignition timing. One very important task now is to turn the engine off after a full warm up and allowing the engine to completely cool. After the engine has cooled, check the coolant level. Using the torque wrench make one last pass to make sure the bolts are at 25 lb-ft.
!!!Support Texas Classic Experience!!!
Did you like the blog? If you did, the best way to support Texas Classic Experience is to share this post! Please tell others that you liked this post by sharing it with your car friends by sending them a link to this page. http://texasclassicchevyexperience.blogspot.com/

My winning Peal Out at the 2011 Lone Star Classic Convention in Dallas
Texas Classic Chevy Experience will post blogs about: Hot Rods, Chevy, Chevrolet, Drag Racing, Car Shows, Classic Cars, Custom Cars, Muscle Cars, How to Tech. posts, Dallas Area Classic Chevy Club, Texas Muscle Car Challenge, Tri-Five Nationals, Lone Star Chevy Convention, Classic Car lists, Classic car links, Spotters guides, Car Shows, Swap meets, Book reviews and More.
*********************
A Great Tri5 Chat Board
No comments:
Post a Comment
Note: Only a member of this blog may post a comment.