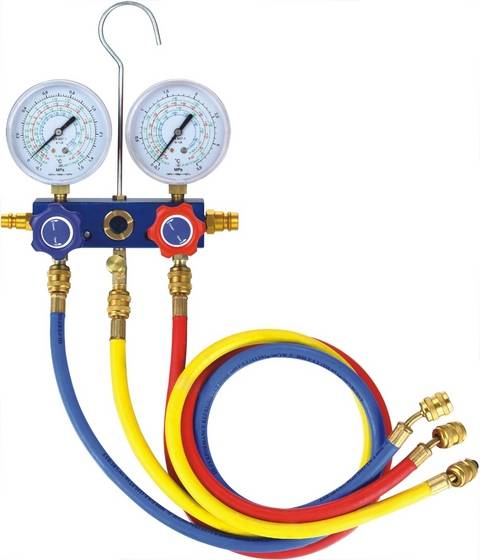
Understanding Manifold Gauges and the Information Given
Air Conditioner Testing and Your Classic Chevy Tri-Five Car
Classic Air Perfect Fit Air Conditioner Install
Retrofit A/C "Hillbilly How To"
Reflections of My Experiences of Installing A/C in My Classic Tri-Five 1957 Chevy
-Alan Arnell
While you are testing you’re A/C system for faults you should set the engines RPM's at 1200 to 1500 RPM, which is slightly above idle. If you have an electric cooling fan and even if you don't you should not rev the engine or hold a high RPM. Doing so could create high pressures, which will make for a dangerous situation. The high pressure will happen, because the electric condenser fans are fixed in speed and will not compensate for the higher RPM's. A bad clutch fan will cause the same problem.
 To start testing you have to set your car up in the so called "MAX" position. MAX may not be a true standard Automotive term, but that is what my friend called it when he taught me how to test my A/C system. Which is, the A/C system on max, the blower on high, doors closed and windows open. Why you ask? Let me tell you.
If you car's A/C setting is on fresh air mode, the heat from the engine could be drawn into the fresh air cowl under the wiper blades. Heat from the underside of the car is the same reason the test is done with the door closed. The heat from those two sources may falsely effect the heat load on the evaporator. Yet we keep the windows open.
Having the windows open helps create a typical and stable heat load. And, my favorite reason is, because it is easier to reach in the car to adjust and test the coolness of the A/C air with you hand. Why make things hard?
Testing should be done with the blower on high. Low blower speed will reduce the heat load on the evaporator. Doing so may cause compressor cycling. You may put the blower on low to force the low side pressure down for the adjustment of the compressor cut-out pressure.
Orifice Tube
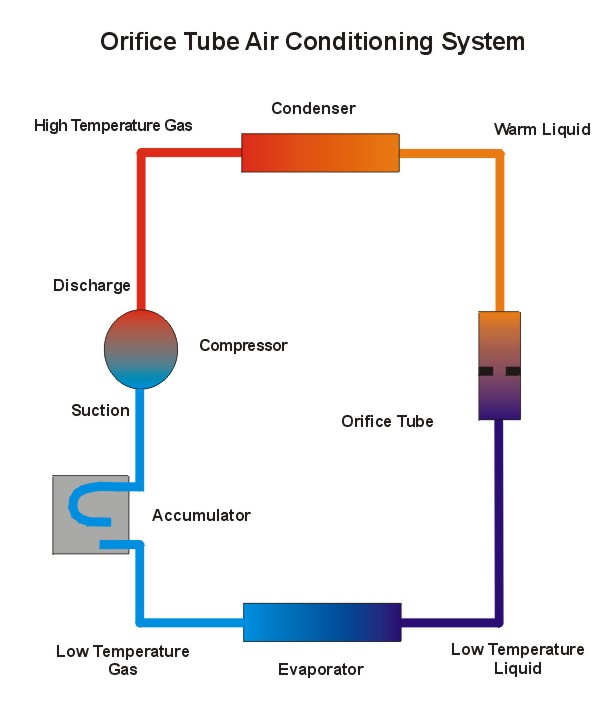
There is 30 psi on the low side and still hot air. Why? The most common reason is the orifice tube system. Even with the evaporator pressure at 30 PSI the refrigerant may still be low. Let us assume that only half the evaporator is full of boiling liquid refrigerant allowing only half the heat removing to occur. That means that only half of the air going through the cold is getting cooled.
Pressure readings will tell that the core temperature is near 30 degrees F, but only half the core is removing any heat. The system is close to being full, yet the discharged air is only slightly cool.
With a fixed orifice, when most folks charge with refrigerants, they will change until the inlet and the outlet of the evaporator is within a degree or two of one another. That is generally the test to see if the quantity of refrigerant is OK.
Nevertheless, at this point the boiling liquid may spill into the accumulator. The outlet will still be cold but a fault may still exist within the system.

The A/C System is still Working Under Hood but BLOWS Hot Air
You need to also be mindful that if the system is working, but for example, the cold air is not coming out of the vents. There may be a blockage or damper problem . If your car has sweat on the accumulator and the low pressure to the compressor it is a good bet that the problem may be in the passenger compartment.
Clogged Orifice Tube
Usually, a clogged or restricted orifice will usually show up as very low suction side pressure. The other side will also have lower than normal high side pressure. As the compressor turns on, the suction against the restricted orifice will cause the compressor to vary rapidly cycle out. When the compressor cuts out the rise in the suction side pressure will then be very slow. A quick compressor turn off and slow to start back up compressor may tell you that you have a clogged orifice. A clogged orifice tube is bad for more than not just allowing the A/C unit from cooling you off. The clog orifice may starve the compressor of oil and cause premature failure.
Bad Compressor
A non working compressor generally will not generate enough suction and pressure at idle at low speeds. If the engine RPM's need to be raised to bring up good pressures that is a sigh the compressor is going bad. Personal experience: My daughter's PT Cruiser was fine on the highway, but when stopped at a red light the A/C air would go hot. I had her take the car in to have the compressor checked. It was ok. After much time and her complaining, I solved the riddle. The PT Cruiser has a two speed fan. The fan was only running at highway speed, which was a slower than needed fan speed for comfortable cooling at slow speeds. This is a prelude to my closing paragraph.

How was the compressor tested on my PT Cruiser and deemed OK? The tech. hooked up the gauges and the pressures were ok. When a compressor is running and the gauges are showing 80 on both side your compressor is broken. Those numbers show the compressor is not producing enough suction or making enough pressure. Adding or removing refrigerant will not make any difference to the low pressures indicated. A fully functional compressor must be able to pull a vacuum and create pressure.
Another way to tell if the compressor is bad was demonstrated by my 1978 Chevrolet black and silver Pace Car Corvette. The compressor froze up to smoke the fan belt and finally making it fall off completely. Of course the broken A/C belt wrapped around the remain belts having them all fall off. I saw white smoke pour out from under the hood. When I pulled over to the side of the road, I saw the power steering pump's power belt pass me rolling down the road like a wheel.
Compressors that use a variable stroke are often misdiagnosed as being defective, when only the internal pressure control device is a fault.
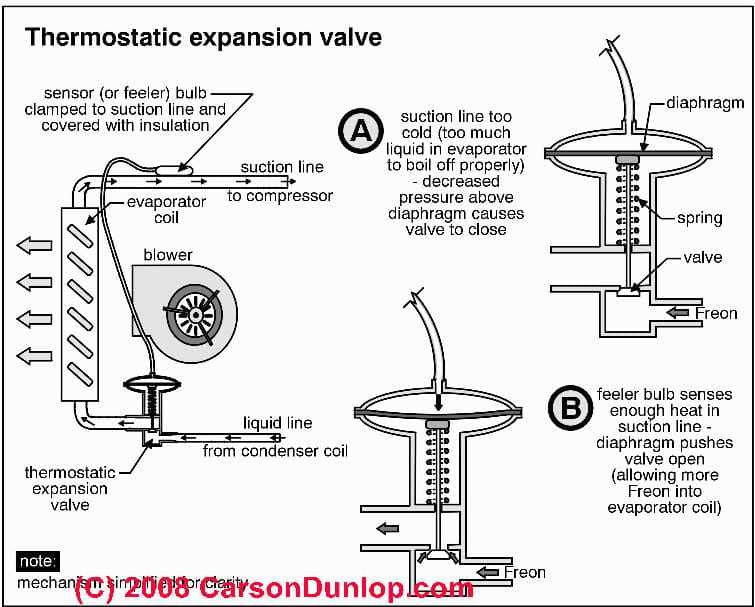
Bad Expansion Valve
Bad expansion valves are hard to diagnose. However, if the A/C is fine in the shop and goes bad on the road it may be the valve. The valves have also been know to stick open and closed or even stick somewhere in-between.
I have been told that the most commend valve failure is the valve being stuck closed . If the
There are so many more problems that can and will occur and ways to sniff them out. You must understand my blog today is very basic with its information. But, the blog's attended audience is the hobbyist and not the professional.
Please Help Grow The Texas Classic Chevy Experience by sharing the blog with your friends. And, please check us out on FaceBook.