Booster Conversion Part 3
Tri-Five Classic Chevy
Proportioning Valve, Dual Master Cylinder and Brake Lines
-by Alan Arnell

Today’s blog is next in the series of upgrading/retrofitting your ‘55, ‘56, ‘57 with front disc brakes with a boosted dual master cylinder. Things get complicated and I will now help to understand the plumbing for the disc brake system improvement. Now is when you will use that tube bender and double flaring tool. Or, you may buy all the parts pre flared and bent into the correct shapes. Really, most of my Tri-Five friends take the whole car and pay a shop to complete the retrofit. Fewer and fewer do the work themselves. Is it because of being old and tired or old and richer? There is nothing wrong with any option for a brake upgrade. A modern disc brake system is one of those true improvements from 50’s technology. You will be safer and happier with 2 or 4 wheel disc brakes, dual master brake cylinder and a valve which proportions and distributes the brake fluid.
The proportioning valve may superiorly help with metering, which is where the back brakes are

The valve with its other great role to the stopping process is the valve’s safety potential of allowing the front or back systems to work independently of each other in case of one or the other lines were to fail. As you can imagine you are on the Sam Rayburn Toll Road trucking along at 75 miles per hour when your exit ramp looms in the distance with a 25 mile per hour jug handle turn you, would like to slow down. Continue that mind’s eye view by visualizing that 58 year old rear brake cylinder deciding to the join that great junk yard in the sky. Bummer! With the valve in place that possibly tragic event of total brake failure will diminish as the front brakes will still function.
Denny Williams suggests to use a valve from a 1974 to 1975 Chevy Nova. That car had front disc brakes and rear drum brakes. When looking for a suitable valve you must consider.
- 4 wheel drum brakes or front disc brakes with rear drum brakes
- The weight of the car
- Single or dual master cylinder (You on want a dual MC)
Put Proportional valve pic here
If you read my last blog you would know that the dual MC is forces fluid to the front and the other tandem piston to the back.
Note: If you do not want a vacuum booster and proportioning valve under your hood, there are early model MCs that had small rubber check valves just inside the outlet ports. These check valves hold a small residual pressure to the wheel cylinders which balance the small pressure at the brake shoe springs and helps seat some of the rubber seal in the cylinder. This is why some people on line at Chevy Talk or Triv-Five.com say you don’t need a proportioning valve. Really, generally after 1969 those internal valves were no longer used. If you have discs you must have a valve.
It is important to know that for disc brakes you must install a proportioning valve.
A must for your new dual MC is a place to attach the proportioning valve; new lines to connect the dual MC to the proportioning valve; additional lines to connecting the valve to the wheel cylinders and or calipers.

With that in mind, you must consider where the brake fluid need to flow with the new system. Brake fluid flow:
- from the front outlet of the MC to intake port of the valve
- from the rear outlet of MC to the rear port of the valve
- from the rear outlet port of the valve port of the rear brakes
- from the front valve outlet to the front brakes
- the other front outlet port to the other front brake

 |
| Dual Master Cylinder |
 |
| This is not how the plumbing is done as described in the blog but gives you some idea of how to plumb the brake lines. |
You could make the short lines that will be installed from the MC to the valve or just buy them. I chose to buy them, since I have little faith I can make such bends in a visible spot under the hood look attractive. When it come to Classic Chevys I’m vain. At least within my limited budget. If you were to make your own insure that you double ralir the ends of the stainless steel tubing and that there are no kinks in the bends. Don’t forget to put the flare nuts on first before the double flare
Let’s get started:
- Remove the old brake line that connects the old MC to the brass block connector on the drivers side, Throw it away.
- Remove the old MC’s 4 holding nuts that connect it to the firewall

'57 Chevy Stock Single Master Cylinder - Remove the line that runs from the brass block connector on the frame to the flexible brake hose for the LEFT block connector where the line was attached
- At the brass block connector on the passenger side frame, disconnect the brake line that takes the fluid to the rear brakes. Install a brass pug in the brass connector where this line was connected. Carefully, bent the line so if points upward and flush with the firewall. I don’t know it that is what I want to do, I may run another way.
- Decide where you want the proportioning valve bracket to be on your new setup. That bracket
will position the valve so that you may easily connect the brake lines in place.Valve Bracket - Instal the booster while slipping the pushrods in place.
- As explained in the first blog; http://www.texasclassicchevyexperience.com/2015/11/tri-five-late-model-power-booster.html adjust the rods usually about ⅛” longer by turning he check nut on the rod. This adjustment is done by feel. You want to push out making contact with the piston cup in the MC. Hold the rod so it will not turn and re-tighten the check nut. This adjustment is made while working under the dash or as in the last blog when the brake assembly harness in a vice.
- Connect the proportioning valve to its bracket. Use lock washers, and tighten


Now for the new brake lines you have bought for your retrofit:
 |
| Bulk fuel tubing with fittings |
- I suggest using number 8 or 10 bare copper electrical wire as a guide before bending brake lines. And, if you need to, practice double flaring brake tubes.
- You will make 2 or use 2 new lines connecting MC to the valve. These two lines will have 4 brass fittings. 3 of them are different and the fittings are hard to find. I bought the whole set up bent and flared off evilBay. 1 tube is ¼” and the other is 3/16”.
- Install the ¼” tubing that connects the rear outlet port of the MC to the rear inlet port of the
Combination valve.MC to valve lines - Install the 3/16” tube from the forward prot of the MC to the front port of the valve. Invertibility, made or bough,t you will have to custom fit them to make a good looking or functional connection
- The line in step 4 will carry brake fluid to the right caliper.
- Using a 30” section of tubing bend and and fit it from the brass block connector along the frame between the “A” arm and steering box and then up the to valve. Cut off the excess tubing. Remember to put on the flair nuts then double flair the tube. The brass block connector will not be located in the same place you will have to custom engineered and fit to your specifications.
- Bend and install the 3/16” brake line from the front port, it’s the one situated at a 45 degree angle on the front of the valve to the flexible brake hose which is clamped into place on the left side of the frame. That line carries brake fluid to the left caliper. No cutting or double flaring involved with this line.
- Now for the last line. Install a line to carry brake fluid from the back of the valve to the rear brakes using a 3/16” tube from the rear outlet port tube that you bent up the rewall in step.
- You will need a union fitting to connect these two pieces of 3/16” tubing together.
- I don’t know about this next pipe installation. Denny Williams bent his over the top of the fire wall besides where the wires on a stock Tri-five travel. I have not seen it done that way, that I know of, I think I will find another way to run the valve, but I hope you get the idea.
- Now all hooked tightly together the system is ready to bleed. I have read in other posts to bench bleed the MC before installing. Bleed the entire system.

WARNING: Brake fluid ruins paint. Cover up your fenders and spread lots of rags below the master cylinder just in case.
Bleeding the brakes. Fill the master cylinder with fresh brake fluid. As the brake bleeding process continues, you will need to keep the bowels of the master cylinder full. DO NOT let them run dry, if you do, you will let air into brake lines and you will need to start the bleeding process all over again. All four wheels will need bleeding. Always start at the wheel furthest from the master cylinder (right rear) and work your way towards the wheel closest to the master cylinder (left front). Caution: spray the wheel cylinder bleeder screws with a rust penetrant the day before to lessen the chance of stripping them. When you have a nice hard brake pedal you can take your next cruise without fear of a catastrophic total brake failure.
 |
| Bleeder and Vacuum pump |
Tip: Use a Bleeder and Vacuum pump type tool for bleeding the brakes. It allows you to do the job by yourself. Your friends and family will greatly appreciate this tool as they no longer have to sit behind the steering wheel listening to, “Push……..Let Up” a couple thousand times.
This is a good time to pump all the old brake fluid out. Brake fluid is hygroscopic (meaning it collects moisture); this will rust out the insides of the wheel cylinders (common cause of brake failure). Manufactures recommend replacing brake fluid annually, when was the last time you replaced yours? When the fluid runs clear, you have gotten the old junk out.
Periodically check the fluid level during the bleeding process. Fill is as necessary or air will get in to defeat all your work.
IMPORTANT:
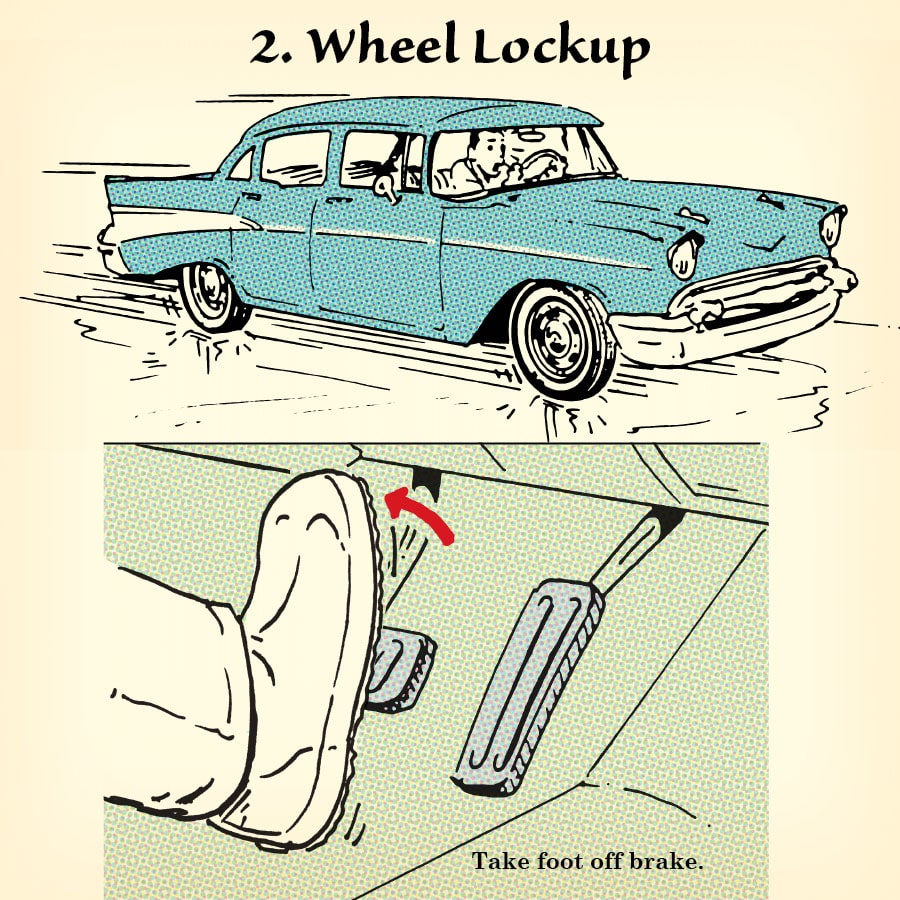
Test and triple check you new retrofitting brake system. Pick a location free from damaging your Classic. In the first test drive try to break the brakes is my what of thinking, while you are ready for a failure for whatever reason. Check for Cops or hateful neighbors and lock up the brakes. Check the skid marks to see if you slide all 4 wheels. Adjust accordingly.
You will have problems. Things will not work correctly. You will have to re-do your work. This happens to everyone, beginner and professional. Make it a part of the fun. I hope you are completing the retrofit brake system as a hobby activity. There is no pressure in this type of mentality. Pressure, is when you are fixing your car late Sunday night to not get fired Monday for not being able to go to work.
I think I will be extremely happy when I have completed this brake retrofit and I’m sure you will as well. The fun, is of course, in the process of any Classic Car work. I will admit that from prior experience of hobby car work the most fun is in the successful completion of the project. Now you need to start buying new parts for the next project!
Citations
- William, Denny. "Late Model Power Brake Booster Conversion." Classic Chevy World Sept. 1984: 5-17. Print.
Links to more Power Brake Posts:
Tri-Five Late Model Power Booster Conversion Part 1
Power Booster Conversion Tri-Five Late Model Part 2
Power to the Front
Move to a Dual Purpose MC and Disk Brakes
Front Disc Brakes for a Tri-Five Classic Chevy
Brake Pedal Clevis Relocation After A Power Assisted Disc Brake Upgrade on a Tri Five Chevy.
Brake Troubleshooting for Tri Five Chevy/ Disc Retrofit
Front Wheel Alignment
++++
!!!Support Texas Classic Experience!!!
Did you like the blog? If you did, the best way to support Texas Classic Experience is to share this post! Please tell others that you liked this post by sharing it with your car friends by sending them a link to this page. http://texasclassicchevyexperience.blogspot.com/
Texas Classic Chevy Experience will post blogs about: Hot Rods, Chevy, Chevrolet, Drag Racing, Car Shows, Classic Cars, Custom Cars, Muscle Cars, How to Tech. posts, Dallas Area Classic Chevy Club, Texas Muscle Car Challenge, Tri-Five Nationals, Lone Star Chevy Convention, Classic Car lists, Classic car links, Spotters guides, Car Shows, Swap meets, Book reviews and More.
*********************
No comments:
Post a Comment
Note: Only a member of this blog may post a comment.