 |
| A standard 350 CI harmonic Balancer |
How To: Classic Chevy Tri-Five
Harmonic Balancer/Damper Removal & Installation
-Alan Arnell
My Classic 1957-candy apple red – non BelAir/150 Chevy had a wobbly harmonic balancer. I decided to replace the balancer with a new one. I received hard two lessons with the repair of the old-bad balancer. How to take off and put on a harmonic balancer and that you have to make sure your replacement part is the correct one before installation.
My Classic Car was retro fitted with a V-8 engine in the late 70's from the original straight six cylinder Chevy engine. When I purchased the Classic Chevy in 2000, I was told it had a 383 CI engine, which is a stroked 350. Stroking the engine increases the cubic inches (CI) of the engine, thus the horse power and torque.
I went to O'Reilly's Auto Parts store and just bought a new balancer for a 350. My engine was made from a 350 block before it was made into a 383. As you may know back in 1977, Hot Rodders use an internally unbalanced crank from a 400 CI-SBC to stroke the engine. The 400’s crank to keep balancing weights from hitting the engine block when installed was not balanced. The 400 crank, in turn, relies on the harmonic balancer and flywheel/flex plate to balance the engine's rotary motions.
I must now say that my buying the wrong balancer is in no way O'Reilly's fault. I am in some ways a
 |
| The offending brute! |
Some say, another annoying thing about me is that I am often wrong in my information, but seldom in doubt. I talked my way into buying the wrong balancer. Gerrrrrrr! What you don't know can hurt you or in my case creates more work for myself. Lesson to be learned? As hard as it is for me, let the auto parts sales person go through the motions to find the correct part.
I didn't do my research for this project, because I thought I was an old hand at balancer installation. I
 |
| The back side of my 400 CI crankshaft balancer |
During my research, I discovered that many 265, 283 CI SBCs and many of the 6-cylinder early Chevy engines had the balancer beat on with a hammer (BFH). Friends told me most guys back in the day did not even use a wooden block to soften the hammer blow when installing the balancer. Not until around 1964 when the large journal 327s came on the market that GM drilled and tapped the end of the crankshaft to allow pulling the balancer onto the crank versus beating it on the engine.
Obviously, the BFH method has its problems. An old engine builder friend told me that many guys drilled and tapped the crank of the older engines to be able to use the better balancer puller method. There is even kits on the market purposely made for this upgrade, that helps you drill the hole and tap the crank . I will not go into that process, because most guys now are using updated modern engines such as the Vortech and LST-2 to name a few. Tapping out an old 283, well, is just not done that much anymore.
Harmonic Balancer/Damper
The balancer is made of several parts. It has, the outer ring isolated from the inner hub with a rubber
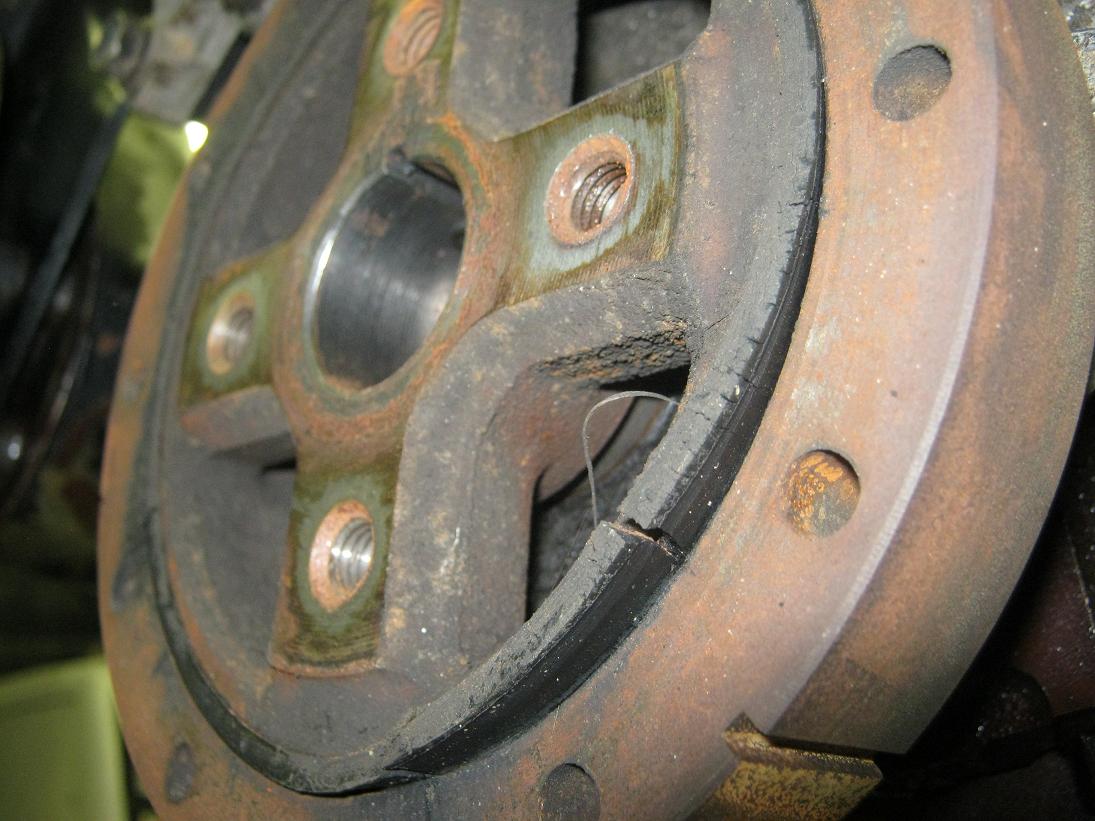 |
| An example of a bad worn out outer harmonic cushion |
The balancer is held on the crank with a 0.002 of an inch interference fit. Beating on the balancer on could start it crooked or damage the outer rubber ring. The best way of installing the balancer is with an installer tool. You could buy the tool or many autoparts stores like O'Reilly's will rent them to you for free with a refundable deposit.
Tech Steps
Disassemble: “How To” Pull of a Harmonic Balancer/Damper
- Disconnect the battery
If possible just loosen the accessory mounting bolts and push them out of the way to loosen the accessory drive belts.
- Remove the accessory drive belts that go to the crank pulley, such as power steering, alternator, cooling fan and A/C
- If equipped, remove the balance's single retaining bolt
- Remove the three bolts that hold the crank pulley onto the balancer
- Remove the crank pulley
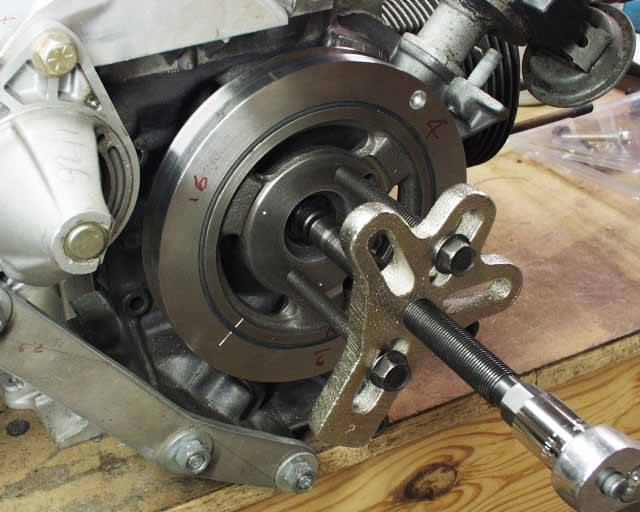
- Put together the harmonic balancer puller. The puller looks like a irregular triangle with a large
threaded rod in its centerBalancer puller - Bolt the puller on the balancer with bolts that held the crank pulley to the balancer.. Don't use a pry bar. Old Pontiac's were done that way but most balancers if you use a crow bar you will more than likely will damage the outer rubber cushion
- Holding the big center bolt of the puller, insert and hand tighten the bolt until there is pressure on the three bolts
- Turn the big bolt in a clockwise direction to exert force to pull the balancer off of the crankshaft. Do not use a gear or pulley puller, again damage will occur to the outer balancer cushion.
- If your balancer will not come off, do not heat it up with a torch. Heat will harm the crank sea
l and now you will have an oil leak to fix. You could spray the slip connection with oil to help it come apart, but there is only a 0.002 of an inch gap between the pressed fit. I think putting on oil will really only make you feel better. My balancer had been on for 35 plus years. It did not want to come off. I put on as much pressure as I felt comfortable with on the puller tool. I let it set for a few hours while I took care of other pressing items. When I came back, since I could not swing a hammer due to the radiator still being in place, I took my air chisel with the punch attachment and let it bang on the bolt of the puller. If that's wrong, my bad. As with the WD40 I put on the balancer shaft's pressed on inner collar, the air chiseling made me feel better. Anyway it came off, so there!Balancer puller kit - Be mindful when the balancer is about to come off, so you do not drop it on your big toe.
- Your next step is to buy the correct balancer for your car if you are indeed replacing the balancer. If you have an older car and can not find a replacement you can have the balancer rebuilt. Link to recommended balancer store Damper Doctor


Tech Steps
Installation: “How To” Put on a Harmonic Balancer/Damper
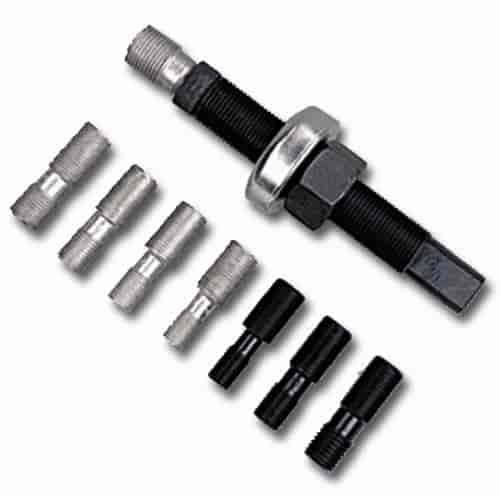
- Lubricate the threads of the installation tool or better yet use anti-seize compound.
- Find the correct thread size bolt, then insert it in the end of the crankshaft's threaded hole, the tool rental kit will have all different inserts, both metric and SAE. You really don't want to use the wrong thread size and strip the internal threads. You will have to use up to 120 pounds of torque to pull the balancer on the engine. That much force will easily strip the threads if you are not careful. Back in the day we just used a bolt and pulled the balancer on the crank. However, you have to have at least ½ inch of the threads in use or the force of the installation may strip the threads out of, God forbid, the inside of the threaded crank bolt hole.
- Carefully, attach the balancer on the end of the crank, insure that balancer is put on square to
the crankshaft and the key way is lined upInstalling tool - The balancer kit I used had a 1 ¼ inch nut on a bearing that was used to, I say push, but the correct way is to say say it is pull on the balancer on the shaft.
- Put on the 1 ¼ inch nut and bearing, with the bearing being on the engine side
- Back off the 1 ¼ inch nut on its threaded bolt.
- Screw in the correct size threaded insert into the end of the big bolt, remember to lubricate the internal crank bolt
- Using the hexagon shaped head of the bolt, insert, then turn the bolt turning the insert into the crankshaft bolt hole as far as it will go, (must use ½ inch of the threads) do not force it, if there is a tight spot, remove the tool and fix the problem
- Tighten the 1 ¼ inch nut down by hand against the bearing and the balancer
Installing kit - With a wrench pull/push the balancer onto the crankshaft using the 1 ¼ inch nut.
- The torque setting is 120 pounds
- Some people recommend that you install a harmonic balancer retaining bolt and washer, in most cases it is not required but check to be sure!
- Put all the belts and pulleys back on, belts, check for belt alignment, tighten accessories
- Hook up the battery.
- Spin the fan by hand to check if it hits, I left a wrench at the bottom of the air shroud once and the fan under engine power hit the protruding wrench to take a chunk out of the fan.
- Double check to see if you have tightened everything down
- Turn the engine over and if everything sounds alright let her rip
- Enjoy

No comments:
Post a Comment
Note: Only a member of this blog may post a comment.