Replacement of a 55, 56, 57
Chevy Trunk Deck
Junk in the Trunk
By-Alan Arnell
This is another throwback blog post about a repair project of the trunk deck of my 1957 Classic Chevy Tri-Five, model/210, 2-door Sedan, that I completed in 2004.
Living in Texas, because of the heat, there is only a short window of time when I work on a classic car. My garage is not air-conditioned and during the summer the temperature can go up to 120 degrees F in the garage. I usually start projects in October and hopefully I will get done before it gets hot again in March.
The project I chose to complete in 2004 was to fix a rusted and ripped up trunk deck. I chose this project at this time, because, as I wrote before in “Oh What A Gas” LINK TO POST that, the gas tank fell out after running over a set of railroad tracks. One of the contributing factors to the scary break down was that the holding bands for the tank were bad, but also the trunk deck, was rotted out, which the the holding bands are bolted.
I also chose this project because money was tight that year and I felt I could at little or no cost make my own parts out of sheet metal. I had in storage a large panel of metal I had salvaged from a roof of a donor car. Repairing the trunk appeared to be a low dollar project. As it was to turn out, I was
As usual, this project hit some unforeseen problems making it more of job than what I estimated. The main culprit was the home made shock absorber bracket that had been installed in in the ‘57 and its removal.
I do not know what Chevrolet was thinking when they designed the rear shock absorber top mounts as part of the sheet metal trunk floor pan. Apparently, years before that mount on my car either broke out, rusted out or both. I could see severe damage of ripped trunk decking where the shock mount had once been in the trunk. To cover the massive holes galvanized A/C-duct sheet metal had been screwed, glued and siliconed in place. A real mess.


To fix the loss of the shock mounts a previous owner welded in a ¼ inch thick by 4 inch steel U-channel for a shock support bar. Way-over kill! Normally, to fix a broken shock mount new mounts are mounted in the sheet metal trunk deck. I chose to eliminate the body shock mounts and installed an external mount. I feel that a shock support bar is a better-more secure shock mount for a Tri-Five application. It is also installed under the truck deck out of sight. The ends of the bar is welded or bolted to the frame.
The shock mount fix at the start of my project in my ‘57 was welded to the drunk deck and wheel wells. I had to cut the huge U-channel out of the trunk. Again way-over kill on the welding. I could not get a grinder to all the hard to reach places where welds were present. I thought I would never get that piece of crap out of the trunk. Finally, I drove my ‘57, very gingerly, to a friends place to use an acetylene gas torch to cut the bar out of the trunk. I had to make the drive without rear shocks. Bouncing all the way, I made it there and back.
With the offending bar removed, I found that the whole axle hump was either gone, rusted or mangled. I had to cut out the whole axle hump and parts of the truck deck as well. Cutting out all that decking made for big holes in the trunk. I needed to make all new parts to give support to the rear of the car

Speaking of the gas tank, I was to learn that some of the old sheet metal patches were put in place with sheet metal screws. Those screws had pierced the gas tank. Since, I bought the car home it had made the garage smell like gasoline. I assumed at first it was the gas cap. I put a piece of tape over the hole in the cap. Still, I could smell gas. I knew that the tank had an external vent hose that went to a connection just above the filler cap location. I had just assumed that the vent was making the gas smell and gave up and learned to live with the smell.
Then, after the gas tank was fixed the smell of gas became stronger than before. During trunk project, I realized that the patches’ screws had gone all the way through the trunk deck into the gas tank. Vibration and movement of the gas tank had enlarged the holes allowing the fumes to emit into
the closed space of the garage. Even worse, when I put the gas tank back in during the, “Oh what a Gas” episode, I had made even more holes in the tank pressing it against the exposed sharp screws. 
The gas tank had to come out and be patched. I had plans to buy a new gas tank, however after eleven years I have not gotten around to that repair. My bad! Anyway, I do not smell gas anymore.
The axle hump is a big upside down “U” shape. The sides were total trash and had to be removed, yet the top if the hump was 60 percent still in good shape. The hump had two horizontal strengthening groves. To save time, I used the center part of the top of the hump during my fabrication of the whole hump. To replace the bad parts, I hammered new

I welded the hump back in place along with other patches in the deck. For some reason the trunk deck had at least 20 holes drilled in it. I took my welder and filled the holes and ground the weld patches smooth.
As I am welding in the hump in my car, I smell something burning. I crawl out of the trunk and check my shirt, because I had already had caught it on fire earlier. After a good check of my shirt, I could not find the fire. I look up to the back of where the back seat would have been had I not taken it out and
covered the opening with plywood, “For Fire Safety!” Between the cracks in the plywood I could see fire. You never know how fast you can move until something is on fire. I had two fire extinguishers ready for such a catastrophe that was now occurring. But, always trying to save a dollar, I also had several old milk jugs filled with water. I looked through the rear open window of the car to see that I had forgotten that I had stored a roll of one inch foam padding in the rear seat area. That foam had caught on fire and was producing a two foot tall flame. I poured water out of the jugs on the fire to put it out. I had removed the back seat and there was no carpet there, so little damage was done other than to my my pride.
Now when I weld, I try not to weld in my attached garage unless I have no choice. When I have to use my welder since that fire, I always bring the garden hose into the garage, with the water turned on and a spray attachment on the end of the hose for just in case.
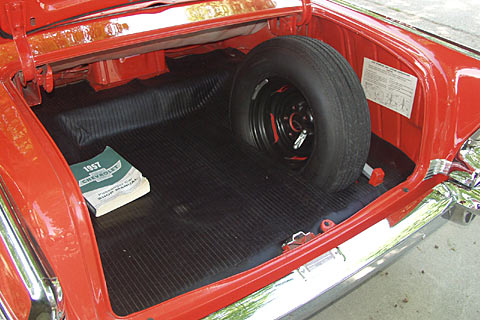
With the sheet metal of the trunk deck complete and put together, I started to make a new shock

The whole thing is a very simple affair. The square pipe is welded to the frame. Two brackets are welded on the bar at an angle, and ½ inch holes are drilled in the center of the brackets for the the shocks to attach. The old shock bar took up trunk space, weighed 50 pounds and looked hideous in the trunk. The new shock bar weighs a couple of pounds, and looks much better out of sight under the car. The only difficult part was knowing how to and where to position the bar and brackets. You could buy a premade bar with all those measurements done for you. I chose not to by a bar and made my own. I asked questions about the measurements on ChevyTalk.org and with those answers made an
I sand blasted the whole trunk deck inside and out. I hate sand blasting. It makes such a mess. Eleven years later when I open the trunk there will be sand that has sifted out from God knows where all over the inside of the trunk area. If I had to do it over, I would just use a D/A sander for the majority of the paint, rust and dirt removal. I would only
With a borrowed paint gun and free paint I layed down a coat of primer paint. Again, I sand the primer to make it flat and prepare the primer for the top coat of gloss black. Two coats of black and I am all finished.

My next project was to sand down the rear seat deck and the back divider between the trunk and the seat. This area of the floor is in real good shape. I only had to do one patch under the passenger rear window on the floor. I knocked out the sanding in only a few hours and painted with primer. The next day, I gave the area two coats of gloss black.
I did not use a spray gun on this paint job. I completed the job with a paint brush. The paint will never be seen, since it is under the rear seat and I did not want over spray all over the inside of the car.
 When Tri-Fives came from the factory the floor deck of the car was not painted. Some car hobbyist when removing a Tri-Five's seats and carpet may find an outline of the window trim. In the factory the guys on the line laid the metal window trim on the floor boards and paint the trim on the floor. So, in reality the only paint the floor was to receive was overspray of other parts that were painted on the floor.
My next big project for the next winter would be the body connection bushings and floor pans under the front seat and foot area in front of the rear seat. The inner rocker panels are completely rusted through and the floor was swiss cheese. I had to replace everything except the transmission and drive shaft hump. This time I sold $1,800 of not needed items I had on eBay and purchased pre-made floor panels.
You live and you learn, but you only learn if you try!
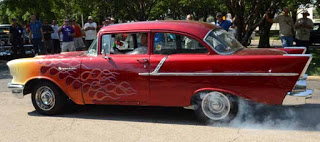
Check back again for more stories of my fun with the Hell Bitch.


++++
!!!Support Texas Classic Experience!!!
Did you like the blog? If you did, the best way to support Texas Classic Experience is to share this post! Please tell others that you liked this post by sharing it with your car friends by sending them a link to this page. http://texasclassicchevyexperience.blogspot.com/
Don’t forget to visit and like Texas Classic Experience on FaceBook: LINK to FaceBook
Texas Classic Chevy Experience will post blogs about: Hot Rods, Chevy, Chevrolet, Drag Racing, Car Shows, Classic Cars, Custom Cars, Muscle Cars, How to Tech. posts, Dallas Area Classic Chevy Club, Texas Muscle Car Challenge, Tri-Five Nationals, Lone Star Chevy Convention, Classic Car lists, Classic car links, Spotters guides, Car Shows, Swap meets, Book reviews and More.
No comments:
Post a Comment
Note: Only a member of this blog may post a comment.