
Tri Five Chevy Ignition Switch Replacement
‘55, ‘56, ‘57 Chevy
-Alan Arnell
Taking out the ignition switch and reinstalling the switch for reasons unbeknownst to this author is a maintenance chore that even the least handy car guy ends up having to complete. It really is an easy thing to do, that is if you know what you are doing. If you do not know the required steps, I do not believe you would naturally know what to do to complete your task.
 Let us start with the basics. An ignition switch has many reasons for its existence. The switch controls the power to many of the car’s accessories and prevents those accessories from running the battery down when turned off. Obviously, the ignition switch serves the purpose of engaging the starter allowing you not to have to hand crank your engine every morning.
To start the car, the engine must be turned over. In the days before ignition switches there were no electric motors to start your car for you. There was elbow grease and a hand crank located at the front of the engine for you to used to cranked over the engine. Sometimes, that hand crank would pop back to break your arm or thumb. With larger engine displacements you had to be a man among men to have the strength to turn that large of an engine over to get it to run. That is why the sales of cars exploded after the invention the electric starter.
During that time before electric start your only other option was to push start your car. Today’s modern ignition systems will not allow that method for starting the car. However back in the day when cars had point in the distributor push starting was a common practice. When I was in college I could not afford a new battery. Illinois is a flat state for the most part. I had to park my car on a hill, so I could get it rolling for a push start. The closest hill for that purpose was a mile away from my place of residence. What you will do when you are young if you have to “make or make do.”
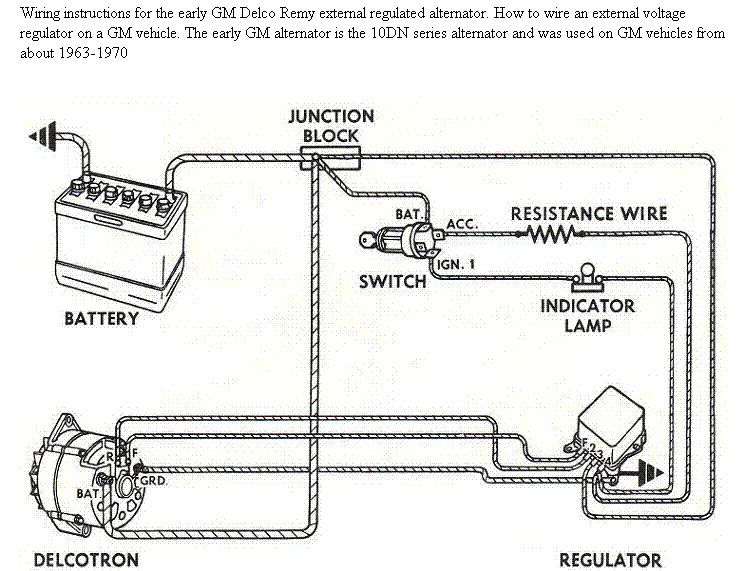
The term ignition switch is generally used to refer to two very different parts: the lock cylinder into which the key is inserted, and the electronic switch that sits just behind the lock cylinder or as I call it the tumblr. I was
watching a Jay Leno YouTube episode about a car he owns that was made at the turn of the last century. The car did not have key, just an on/ff switch. I would like to say those were the days, however Jay had an aftermarket part sold at the same time that blocked the wheels so your car could not be stolen. “As things change, the more they remain the same.”- Alphonse Karr 'click to tweet'
 |
| Electronic switch and lock cylinder |
How to Repair a Tri-Five Ignition Switch
- Raise the hood and disconnect the negative battery connection from the battery.
- Remove the lock cylinder by positioning the switch with key inserted in the lock position.
- Insert a wire in the small press plunger hole on the face of the key tumblr. (a paper clip works best)

- Push in on the paper clip to release the holding catch of the plunger
- While holding down the paper clip with the key in the switch turn the tumblr counterclockwise until the cylinder can be removed. (It usually takes several attempts to make this work and then you will be astonished when the tumblr just falls out. )
- Disconnect the wire connector from the ignition switch (as as potential time saver identify the wires as removed, I use masking tape and a Magic Marker)
- Remove the bezel and its retaining spring (It just pulls off, I try not to use a pry device, so as not to scratch the dashboard.)
- Remove the spanner nut (Here is where you will need to be creative, the nut has a slot for removal that is too wide to use a screwdriver. I have used a wood chisel.,( it was too sharp and marred the pot metal finish.) a putty knife, (it was too thin and slipped out.) I finally I made a device the same
thickness as the nut's groves and required width out of a piece of steel flat rod, using a grinder and a hacksaw. You could just use your hand to twist the nut off if it is not too tight.)Spanner nut - With the nut removed the switch will back out through the instrument panel for removal.

7u9WB2g~~60_35.JPG)
Ignition Switch Installation
- Position the switch into the instrument panel.
- While holding the switch in one hand screw on the spanner nut. (Make the nut snug but not tight)
- Install the bezel and its retaining spring. (Double check to see if the switch behind the instrument panel is right side up, I put it in upside down once. Very annoying! Now you have to play with the position of the switch so your key lines up correctly with the labels on the bezel. With everything all lined up correctly, remove the bezel to really tighten the nut to keep the whole thing from turning while trying start you car. Very embarrassing! )
- Connect the wires to the ignition switch
- Replace the lock cylinder. ( I keep the key in the cylinder to then line up the key to the off position. When in place turn the key to start and it will lock into place. Remove the key. If you remove the key and the tumblr stay in place you have put the tumblr in correctly.)
- Hook up you negative battery cable and lower the hood
There you go. Very easy with a little bit of finagling.
No comments:
Post a Comment
Note: Only a member of this blog may post a comment.