Showing posts with label Disc Breaks. Show all posts

Saturday, January 16, 2016

Brake Troubleshooting for Tri Five Chevy/ Disc Retrofit

Brake Troubleshooting
for a Tri-Five Chevy
   -Alan Arnell


Not long ago I wrote a post “That Nagging Hole.” LINK Within that article I boasted, “If you have 18” of manifold vacuum and the system has been pressure bled, there are not too many things left to cause bad brakes.”  Call me a pessimist or a realist, nonetheless I am having trouble with that hot sports opinion.  


The name I have given to my ‘57 Chevy model 150 2-door sedan Chevy Classic is The Hell Bitch.  I stole the name from Larry McMurtry's book and TV-movie “Lonesome Dove.”  Hell Bitch was the name of Woodrow F. Call’s horse because of her contrary nature.  I love my car, however sometimes during a emotional rage, I think she hates me.  I just know if there can be a problem with any work I complete on The Hell Bitch there will be a problem.  I better have a few tricks up my sleeve, before I boldly go forth with my disc brake upgrade project.


With that anchor around my neck, I have been brooding about what could go wrong with my disk brake retrofit/upgrade project that I have not looked up or thought of doing to my project.   It is not just my sometime glass half empty attitude that makes me feel this way.   I have been told by friends and I have read about all the troubles my fellow Tri-Five Classic Chevy lovers have had with new disk brakes. For example: Let us say, I have an imaginary friend who had just completed his new brakes upgrade.  During his test drive, the brakes worked, maybe, better than the old drums, but his car does not have the stopping on a dime performance he was hoping for with his ‘56 Belair 2-door hardtop.


He has a 350 CI-SBC with a TH350 transmission.  During his retrofit he added all new lines, hoses and a vacuum line.  The new setup has front discs with single piston calipers and a new power booster and master cylinder.  The rear brakes are drums but they had been given new shoes and springs.  He has 18 pounds of vacuum to the power booster.  Like I said, the brakes work but work about as well as an enlarged prostate patient trying to take a...well you know.


To solve my imaginary friend’s brake delima, I went to the books to research remedies.


The different automotive writings I search through state you should start with a brake pressure gauge
to check pressure at each caliper or drums and at each master-cylinder outlet port.  Be sure that you
have deactivated or bypassed the proportioning valve.  Under testing at full hydraulic pressure a correct pressure should range between 900 and 1,000 psi with manual brakes and 14,000 plus psi with a power-assisted brakes.  If you get a pressure less than those amounts at one or more of the wheels and at the master cylinder you have a problem with the in the lines or at the calipers and/or drums.  


Say that there is high pressure everywhere, yet the brakes do not lock up, then there are even bigger problems, because that tells that you have a master cylinder, calipers and drums that are mismatched or incompatible.  


If there is low pressure readings everywhere you may be looking at a bad master cylinder, power booster and/or brake pedal.  However, if you know for certain that the system has been bled correctly and you have a firm pedal with low pressure readings, that generally rules out a defective master cylinder.  This is because the cylinder is not bypassing internally.


Remember Occam’s Razor- “The simplest answer is usually correct.”


At this point, I would suggest checking to see if you have at least 14 pounds of engine vacuum, no vacuum leaks, and that the brakes have been bled correctly.  Just saying!


To check to see if the booster is OK you can use a command handheld vacuum-pump.  After extreme effort, you can make a vacuum in the booste with the hand pump.  When you have pumped out
18 inches of vacuum that reading should stay steady. If the pressure drops you have a defective booster.


Say you have a steady 18 inches of vacuum and the knowledge that your booster is OK.  The next thing to check is the brake pedal and how it lines up and operates the booster and master cylinder.


All brake pedals are really  fancy levers that increases a braking system’s force.


“Give me a lever long enough …  and I shall move the world.” - Archimedes


A manual brake system usually has a 6:1 pedal ratio with a ⅞ or 1” bore master cylinder.  A power system on the other hand only needs a 4:1 ratio using a 1 ⅛ “ bore master cylinder.  With that in mind you must check to see if your pedal has enough travel to make a long enough stroke in the master cylinder and power booster to move the correct amounts of brake fluid to engage the brakes.  Double check to see if your setup is producing a full stroke  


Even if there is enough engine vacuum, if you don’t supply the maximum stroke to the master cylinder you are not getting the highest level of braking power.  It is like your if you chihuahua named Tinkerbell got behind the brake pedal while you are trying to stop.  The push rod must be given its full measure of travel to make your brakes work to their highest level.


Pedal advantage is determined by measuring the length of the pedal arm from the push pedal to the pivot point.  To measure this distance correctly you have to measure the distance straight down from the topo pivot while using a level to mark the the arc of the push pedal.  By doing so,
you are making a triangle.  The pedal arm is the hypotenuse of the triangle, the horizontal swing of the push pedal is the short leg of the triangle and the vertical distance from the swing to the pivot is the long leg of the triangle.


You want the long leg of the triangle measurement to be divided by distance between the pivot and the master-cylinder pushrod hole. Again use the triangle method to determine the distance.  


LINK TO NORTH TEXAS CAR SHOWS AND EVENTS
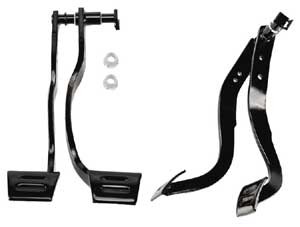

During the era of Muscle Cars, Chevy brake pedals came from the factory with an upper and a lower master-cylinder pushrod hole. The top hole was used for manual brakes and the bottom hole was used for power brakes.  Remember that power brakes require less ratio than manual brakes.


Another problem to consider is that some smaller boosters may not allow enough stroke with big production brake systems.  If you do not have the room for a larger booster a smaller-bore master cylinder could be used to fix the problem.  (I don’t even want to think about the troubles you would have to overcome to make that work?)


The last things to consider.  Your brake line should be hard lines up to the point they connect to the brake calipers or to the "T" to the rear axle hard lines.  The rubber hoses from that point to the brake cylinder or calipers should be a rubber teflon-core hose.  Never use a rubber-core hose you would use for fuel or oil lines.  

Another alternative is to use teflon-core stainless hose.  This hose is the best to use for more powerful braking systems because they will not expand as easily under high braking pressure or heat.  That expansion of the line will degrade the amount of braking power available and usually at the worst time.


I hope you and I do not have to use this information.  But knowledge is power, or so they say.

Links to more Power Brake Posts:


Tri-Five Late Model Power Booster Conversion Part 1


Power Booster Conversion Tri-Five Late Model Part 2
Power to the Front
Move to a Dual Purpose MC and Disk Brakes
Front Disc Brakes for a Tri-Five Classic Chevy


Power Booster Conversion Tri-Five Late Model Part 3
Tri-Five Classic Chevy
Proportioning Valve, Dual Master Cylinder and Brake Lines


Brake Pedal Clevis Relocation After A Power Assisted Disc Brake Upgrade on a Tri Five Chevy.


Front Wheel Alignment


++++
Classic chevy, Tri-Five, Classic Car, Chevy, Chevrolet, Belair, Car show, Custom car
Muscle car,  Hot Rod, Street Rod, Drag Racing, 55 Chevy, 56 Chevy, 57 Chevy, Street Racing


!!!Support Texas Classic Experience!!!
Did you like the blog?  If you did, the best way to support Texas Classic Experience is to share this post!  Please tell others that you liked this post by sharing it with your car friends by sending them a link to this page.  http://texasclassicchevyexperience.blogspot.com/


Don’t forget to visit and like Texas Classic Experience on FaceBook:  LINK to FaceBook


Texas Classic Chevy Experience will post blogs about: Hot Rods, Chevy, Chevrolet, Drag Racing, Car Shows, Classic Cars, Custom Cars, Muscle Cars, How to Tech. posts, Dallas Area Classic Chevy Club, Texas Muscle Car Challenge, Tri-Five Nationals, Lone Star Chevy Convention, Classic Car lists, Classic car links, Spotters guides, Car Shows, Swap meets, Book reviews and More.


*********************

Saturday, January 9, 2016

Brake Pedal Clevis Relocation After A Power Assisted Disc Brake Upgrade on a Tri Five Chevy.

That Nagging Hole!
Tri-Five Front Disc Brake Retrofit Part 3
  -by Alan Arnell


This blog is a result of my trying to solve a nagging question that I have had about my Tech Blog series:  Tri-Five Late Model Power Booster Conversion.  I have to explain, that I did not just start researching how to update my brake system before I wrote that blog series. Actually, I have been thinking and reading about the retrofit for years.  I even thought of just updating only the master cylinder many years ago.  My friend Paul had a catch phrase that sums up why it has taken me 15 years to upgrade my brakes.  He would say, “I want disc brakes on my car; but! You have to have three things: the time, the money and the inclination.  It seems, I never have all three at the same time!”  'click to tweet!'  Oh! By the way, I have all the parts for the brake upgrade, however they are in a box in the corner of my garage.  I think I’m doing good, I have only had the parts for a year.


After writing my disc brake blog, In the back of my mind I kept remembering a tech sheet
created by the Great Lakes Chevys or something like that.  This "how to" instructions made all the rounds during the early internet days.  I had made multiple readings of the instructions during that time.  Ten or so years later the memory of that tech sheet is still in my recollections, however I only have a vague recollection of those instructions.  I have search the internet to no avail. The Great Lakes Brake Upgrade Instructions and Parts list is no where to be found. To make matters worse, I have this nagging memory that one the tech sheet’s steps had you drilling a new clevis hole in the brake swing pedal arm.  Why was the step done in the Great Lakes’s Tech Sheet and not in my latest research?

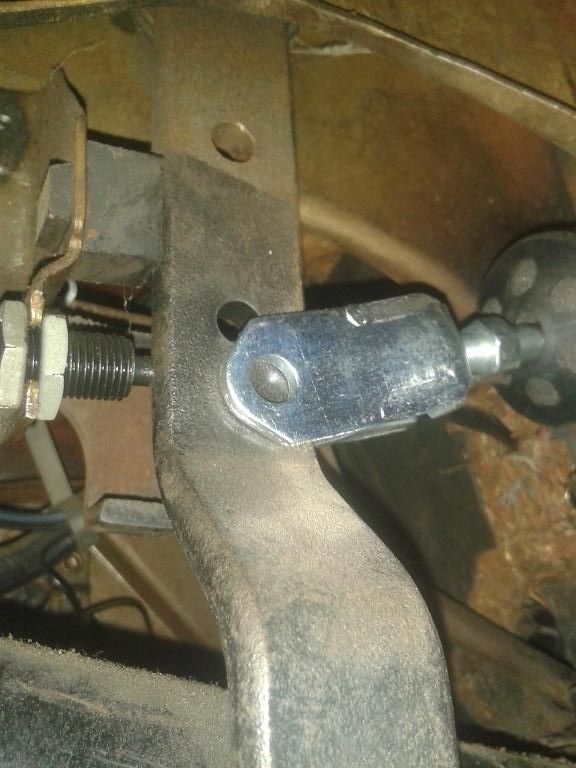
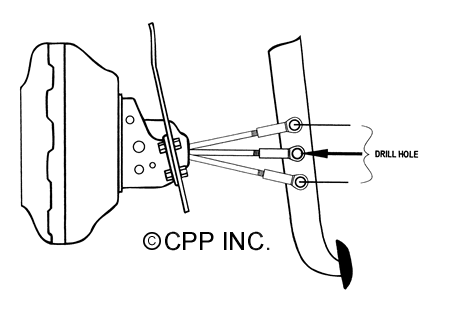
By chance, I found some old car magazines in a closet. In one of the magazines, I found my answer:  If you have 18” of manifold vacuum and the system has been pressure bled, there are not too many things left to cause bad brakes. However, many Tri-Five owners choose a booster that is bracketed with a tilt upward at about 6 or 7 degrees.  The tilt is put in place to give some extra travel to the booster pushrod.  A new hole drilled 1” below the original clevis hole will produce the needed extra pedal swing that the tilt requires.  This new hole will also keep the push rod from binding.+

I am happy now!  I now know if you have a tilted up booster/master cylinder you should
make a new clevis hole to increase the travel length of the pushrod. If you have a non-tilted booster/master cylinder the hole may not be required.


Links to more Power Brake Posts:


Tri-Five Late Model Power Booster Conversion Part 1


Power Booster Conversion Tri-Five Late Model Part 2
Power to the Front
Move to a Dual Purpose MC and Disk Brakes
Front Disc Brakes for a Tri-Five Classic Chevy


Power Booster Conversion Tri-Five Late Model Part 3
Tri-Five Classic Chevy
Proportioning Valve, Dual Master Cylinder and Brake Lines


Brake Troubleshooting for Tri Five Chevy/ Disc Retrofit


Front Wheel Alignment


++++
Classic chevy, Tri-Five, Classic Car, Chevy, Chevrolet, Belair, Car show, Custom car
Muscle car,  Hot Rod, Street Rod, Drag Racing, 55 Chevy, 56 Chevy, 57 Chevy, Street Racing


!!!Support Texas Classic Experience!!!
Did you like the blog?  If you did, the best way to support Texas Classic Experience is to share this post!  Please tell others that you liked this post by sharing it with your car friends by sending them a link to this page.  http://texasclassicchevyexperience.blogspot.com/


Don’t forget to visit and like Texas Classic Experience on FaceBook:  LINK to FaceBook


Texas Classic Chevy Experience will post blogs about: Hot Rods, Chevy, Chevrolet, Drag Racing, Car Shows, Classic Cars, Custom Cars, Muscle Cars, How to Tech. posts, Dallas Area Classic Chevy Club, Texas Muscle Car Challenge, Tri-Five Nationals, Lone Star Chevy Convention, Classic Car lists, Classic car links, Spotters guides, Car Shows, Swap meets, Book reviews and More.

*********************
__________
+"Tech Quicks: Don't Forget the Hole!" Chevy Classics Oct. 2007: p.79


Wednesday, December 2, 2015

Power Booster Conversion Tri-Five Late Model Part 3

Booster Conversion Part 3
Tri-Five Classic Chevy
Proportioning Valve, Dual Master Cylinder and Brake Lines
    -by Alan Arnell


Today’s blog is next in the series of upgrading/retrofitting your ‘55, ‘56, ‘57 with front disc brakes with a boosted dual master cylinder.  Things get complicated and I will now help to understand the plumbing for the disc brake system improvement.   Now is when you will use that tube bender and double flaring tool.  Or, you may buy all the parts pre flared and bent into the correct shapes. Really, most of my Tri-Five friends take the whole car and pay a shop to complete the retrofit. Fewer and fewer do the work themselves.  Is it because of being old and tired or old and richer? There is nothing wrong with any option for a brake upgrade.  A modern disc brake system is one of those true improvements from 50’s technology.  You will be safer and happier with 2 or 4 wheel disc brakes, dual master brake cylinder and a valve which proportions and distributes the brake fluid.


The proportioning valve may superiorly help with metering, which is where the back brakes are
engaged before the front discs, keeping you off that banana peel while stopping.  The valve may have a failure warning switch to warn to the sad fact of brake failure.  “Warning, Warning, Will Robinson!” The proportioner function improves front to rear brake balance at high speed stops. This function is done by compensating for the dipping down in the nose to produce a loss of weight to the rear wheels avoiding a rear end skid.


The valve with its other great role to the stopping process is the valve’s safety potential of allowing the front or back systems to work independently of each other in case of one or the other lines were to fail.  As you can imagine you are on the Sam Rayburn Toll Road trucking along at 75 miles per hour when your exit ramp looms in the distance with a 25 mile per hour jug handle turn you, would like to slow down.  Continue that mind’s eye view by visualizing that 58 year old rear brake cylinder deciding to the join that great junk yard in the sky.  Bummer!  With the valve in place that possibly tragic event of total brake failure will diminish as the  front brakes will still function.


Denny Williams suggests to use a valve from a 1974 to 1975 Chevy Nova.  That car had front disc brakes and rear drum brakes.  When looking for a suitable valve you must consider.
  1. 4 wheel drum brakes or front disc brakes with rear drum brakes
  2. The weight of the car
  3. Single or dual master cylinder  (You on want a dual MC)


Put Proportional valve pic here


If you read my last blog you would know that the dual MC is forces fluid to the front and the other tandem piston to the back.


Note: If you do not want a vacuum booster and proportioning valve under your hood, there are early model MCs that had small rubber check valves just inside the outlet ports.  These check valves hold a small residual pressure to the wheel cylinders which balance the small pressure at the brake shoe springs and helps seat some of the rubber seal in the cylinder.  This is why some people on line at Chevy Talk or Triv-Five.com say you don’t need a proportioning valve.  Really, generally after 1969 those internal valves were no longer used.  If you have discs you must have a valve.


It is important to know that for disc brakes you must install a proportioning valve.


A must for your new dual MC is a place to attach the proportioning valve; new lines to connect the dual MC to the proportioning valve; additional lines to connecting the valve to the wheel cylinders and or calipers.


With that in mind, you must consider where the brake fluid need to flow with the new system.  Brake fluid flow:
  1. from the front outlet of the MC to intake port of the valve
  2. from the rear outlet of MC to the rear port of the valve
  3. from the rear outlet port of the valve port of the rear brakes
  4. from the front valve outlet to the front brakes
  5. the other front outlet port to the other front brake


Dual Master Cylinder
This is not how the plumbing is done as described in the blog but gives you some idea of how to plumb the brake lines.


You could make the short lines that will be installed from the MC to the valve or just buy them.  I chose to buy them, since I have little faith I can make such bends in a visible spot under the hood look attractive.  When it come to Classic Chevys I’m vain.  At least within my limited budget. If you were to make your own insure that you double ralir the ends of the stainless steel tubing and that there are no kinks in the bends.  Don’t forget to put the flare nuts on first before the double flare


Let’s get started:


  1. Remove the old brake line that connects the old MC to the brass block connector on the drivers side,  Throw it away.
  2. Remove the old MC’s 4 holding nuts that connect it to the firewall
    '57 Chevy Stock Single Master Cylinder
  3. Remove the line that runs from the brass block connector on the frame to the flexible brake hose for the LEFT block connector where the line was attached
  4. At the brass block connector on the passenger side frame, disconnect the brake line that takes the fluid to the rear brakes.  Install a brass pug in the brass connector where this line was connected.  Carefully, bent the line so if points upward and flush with the firewall.  I don’t know it that is what I want to do,  I may run another way.
  5. Decide where you want the proportioning valve bracket to be on your new setup.  That bracket
    Valve Bracket
    will position  the valve so that you may easily connect the brake lines in place.  
  6. Instal the booster while slipping the pushrods in place.
  7. As explained in the first blog; http://www.texasclassicchevyexperience.com/2015/11/tri-five-late-model-power-booster.html  adjust the rods usually about ⅛” longer by turning he check nut on the rod.  This adjustment is done by feel.  You want to push out making contact with the piston cup in the MC.  Hold the rod so it will not turn and re-tighten the check nut.  This adjustment is made while working under the dash or as in the last blog when the brake assembly harness in a vice.
  8. Connect the proportioning valve to its bracket.  Use lock washers, and tighten


Now for the new brake lines you have bought for your retrofit:
Bulk fuel  tubing with fittings


  1. I suggest using number 8 or 10  bare copper electrical wire as a guide before bending brake lines.  And, if you need to, practice double flaring brake tubes.
  2. You will make 2 or use 2 new lines connecting MC to the valve.  These two lines will have 4 brass fittings.  3 of them are different and the fittings are hard to find.  I bought the whole set up bent and flared off evilBay.  1 tube is ¼” and the other is 3/16”.
  3. Install the ¼” tubing that connects the rear outlet port of the MC to the rear inlet port of the
    MC to valve lines
    Combination valve.  
  4. Install the 3/16” tube from the forward prot of the MC to the front port of the valve.  Invertibility, made or bough,t you will have to custom fit them to make a good looking or functional connection
  5. The line in step 4 will carry brake fluid to the right caliper.  
  6. Using  a 30” section of tubing bend and and fit it from the brass block connector along the frame between the “A” arm and steering box and then up the to valve.  Cut off the excess tubing.  Remember to put on the flair nuts then double flair the tube.  The brass block connector will not be located in the same place you will have to custom engineered and fit to your specifications.
  7. Bend and install the 3/16” brake line from the front port, it’s the one situated at a 45 degree angle on the front of the valve to the flexible brake hose which is clamped into place on the left side of the frame.  That line carries brake fluid to the left caliper. No cutting or double flaring involved with this line.
  8. Now for the last line.  Install a line to carry brake fluid from the back of the valve to the rear brakes using a 3/16” tube from the rear outlet port tube that you  bent up the rewall in step.
  9. You will need a union fitting to connect these two pieces of 3/16” tubing together.  
  10. I don’t know about this next pipe installation.  Denny Williams bent his over the top of the fire wall besides where the wires on a stock Tri-five travel.  I have not seen it done that way, that I know of,  I think I will find another way to run the valve, but I hope you get the idea.
  11. Now all hooked tightly together the system is ready to bleed.  I have read in other posts to bench bleed the MC before installing.  Bleed the entire system.
WARNING: Brake fluid ruins paint. Cover up your fenders and spread lots of rags below the master cylinder just in case.


Bleeding the brakes. Fill the master cylinder with fresh brake fluid. As the brake bleeding process continues, you will need to keep the bowels of the master cylinder full. DO NOT let them run dry, if you do, you will let air into brake lines and you will need to start the bleeding process all over again. All four wheels will need bleeding. Always start at the wheel furthest from the master cylinder (right rear) and work your way towards the wheel closest to the master cylinder (left front). Caution: spray the wheel cylinder bleeder screws with a rust penetrant the day before to lessen the chance of stripping them. When you have a nice hard brake pedal you can take your next cruise without fear of a catastrophic total brake failure.
Bleeder and Vacuum pump


Tip: Use a Bleeder and Vacuum pump  type tool for bleeding the brakes. It allows you to do the job by yourself. Your friends and family will greatly appreciate this tool as they no longer have to sit behind the steering wheel listening to, “Push……..Let Up” a couple thousand times.  


This is a good time to pump all the old brake fluid out. Brake fluid is hygroscopic (meaning it collects moisture); this will rust out the insides of the wheel cylinders (common cause of brake failure). Manufactures recommend replacing brake fluid annually, when was the last time you replaced yours? When the fluid runs clear, you have gotten the old junk out.  


Periodically check the fluid level during the bleeding process.  Fill is as necessary or air will get in to defeat all your work.


IMPORTANT:
Test and triple check you new retrofitting brake system.  Pick a location free from damaging your Classic.  In the first test drive try to break the brakes is my what of thinking, while you are ready for a failure for whatever reason.  Check for Cops or hateful neighbors and lock up the brakes.  Check the skid marks to see if you slide all 4 wheels.  Adjust accordingly.


You will have problems.  Things will not work correctly.  You will have to re-do your work.  This happens to everyone, beginner and professional.  Make it a part of the fun.  I hope you are completing the retrofit brake system as a hobby activity.  There is no pressure in this type of mentality. Pressure, is when you are fixing your car late Sunday night to not get fired Monday for not being able to go to work.


I think I will be extremely happy when I have completed this brake retrofit and I’m sure you will as well.  The fun, is of course, in the process of any Classic Car work.  I will admit that from prior experience of hobby car work the most fun is in the successful completion of the project.  Now you need to start buying new parts for the next project!

Citations


Links to more Power Brake Posts:


Tri-Five Late Model Power Booster Conversion Part 1


Power Booster Conversion Tri-Five Late Model Part 2
Power to the Front
Move to a Dual Purpose MC and Disk Brakes
Front Disc Brakes for a Tri-Five Classic Chevy

Brake Pedal Clevis Relocation After A Power Assisted Disc Brake Upgrade on a Tri Five Chevy.


Brake Troubleshooting for Tri Five Chevy/ Disc Retrofit


Front Wheel Alignment

++++
Classic chevy, Tri-Five, Classic Car, Chevy, Chevrolet, Belair, Car show, Custom car
Muscle car,  Hot Rod, Street Rod, Drag Racing, 55 Chevy, 56 Chevy, 57 Chevy, Street Racing


!!!Support Texas Classic Experience!!!
Did you like the blog?  If you did, the best way to support Texas Classic Experience is to share this post!  Please tell others that you liked this post by sharing it with your car friends by sending them a link to this page.  http://texasclassicchevyexperience.blogspot.com/


Don’t forget to visit and like Texas Classic Experience on FaceBook:  LINK to FaceBook

Texas Classic Chevy Experience will post blogs about: Hot Rods, Chevy, Chevrolet, Drag Racing, Car Shows, Classic Cars, Custom Cars, Muscle Cars, How to Tech. posts, Dallas Area Classic Chevy Club, Texas Muscle Car Challenge, Tri-Five Nationals, Lone Star Chevy Convention, Classic Car lists, Classic car links, Spotters guides, Car Shows, Swap meets, Book reviews and More.

*********************